How to Fix “Element is not clickable” in Selenium WebDriver tests?
Three ways to resolve the “Element is not clickable” issue in Selenium.
You can find more Selenium examples like this one in my eBook: Selenium WebDriver Recipes in Ruby. This is also included in the “How to in Selenium WebDriver” series.
“Element is not clickable” is a common error that Selenium test automation engineers often encounter. This might be applicable to other test automation frameworks with different error messages. There are two possible causes:
The element is not clickable, such as disabled or not allowed to click by nature (e.g. a hidden field)
this is easy to find out by inspecting (via right-click in Chrome). The solution is to change/refine the locator.The element is not viewable in the browser, by the definition of Selenium, not humans (there might a very minor differences)
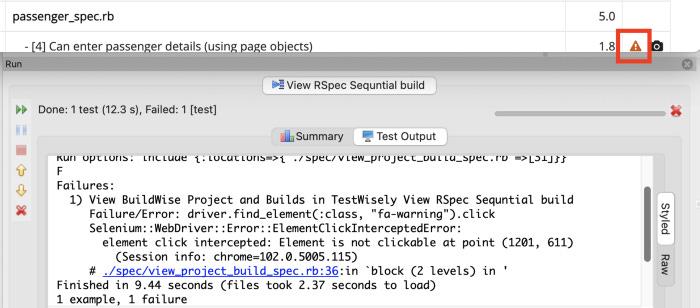
This article will explain the second type. Below is a test failure of trying to click the exclamation icon.
Tip: run the test and keep the browser open so that you can inspect the web page, test scripts and test output all-together. Check out: Keep the Browser Open after Executing an Individual Test.
Analyse
The test step:
driver.find_element(:class, "fa-warning").clickThe error output:
Failure/Error: driver.find_element(:class, "fa-warning").click
     Selenium::WebDriver::Error::ElementClickInterceptedError:
      element click intercepted: Element is not clickable at point (1201, 611)
       (Session info: chrome=102.0.5005.115)
The reason:
Selenium is unable to click the exclamation icon, which is inside the viewable of the browser window. However, it is just, not enough for Selenium, even though we (human beings) could see it. This is a rare case (clickable element on the edge of the window), a more common case is where the element is off-screen.
Initial solutions:
Make the browser window bigger (not recommended).
Depending on the page content and browser size, it might work in some cases.Scroll the webpage down further to make the element fully visible.
My recommendation, see below.
Solution
There are several approaches to scrolling in Selenium.
Scroll based on the element’s X,Y coordinate
elem = driver.find_element(:class, "fa-warning")
elem_pos = elem.location.y
driver.execute_script("window.scroll(0, #{elem_pos + 100})")
sleep 0.5 # add delay to allow JS execution
elem.click
The above test script works. The 100 is, obviously, one of many possible scroll-down pixels.
The explanation:
Find the element
Get the Y position of the element in the browser
Invoke JavaScript to scroll down a further 100 pixels
Add a small delay to allow JS scrolling to complete
Click the element (now fully visible)
As you can see, this approach is flexible, i.e., you can fine-tune the scrolling.
2. Invoke JavaScript scrollIntoView .
elem = driver.find_element(:class, "fa-warning")
driver.execute_script("arguments[0].scrollIntoView(true);", elem);
sleep 0.5
elem.click
Tip: when you debug/refine a single test step, try to find a way to attach the test execution (of modified test steps) against the current browser. Then, you can be focused and repeatedly trying for that step, a big time-saver in test automation. For more, check out the article “Attach Selenium Python test steps against an existing browser” (the article uses Python tests as example, the same works for Ruby and JS too in TestWise IDE).
However, I vaguely remember that this way did not work on a few occasions. So, I preferred Approach #1. You may choose the style you prefer. Test Automation is practical, i.e., if it works reliably, that’s fine.
Two common scrolling JS functions:
# to bottom
driver.execute_script("window.scrollTo(0, document.body.scrollHeight);")# to top
driver.execute_script("window.scrollTo(0, 0);")
3. Scroll wheel actions (from Selenium v4.2)
Selenium v4.2 introduced Scroll wheel actions, which make scrolling easier, as a part of Advanced User Interactions. (please note that scrolling has always been possible, see the above).
elem = driver.find_element(:class, "fa-warning")
driver.action.scroll_by(100, 200).perform
elem.click
Astute readers might notice that sleep 0.5 is no longer there. Yes, because it is not done by JS this time. This method uses relative scrolling (i.e. the above snippet will go 100 pixels to the right and 200 pixels down from the current scroll position), not absolute like the previous two methods.
The new scrolling functions added in Selenium v4.2:
scroll_to(ELEM)
scroll_by(DELTA_X, DELTA_Y)
scroll_from(SCROLL_ORIGIN, DELTA_X, DELTA_Y)
Some might wonder: “Why not using scroll_to(elem) , rather scroll_by in your example?”
The reason: I trust the scroll_by more, with specific scrolling. Having said that, I tried the scroll_to .
driver.action.scroll_to(elem).performAn error occurred, as I expected.
Selenium::WebDriver::Error::MoveTargetOutOfBoundsError:
 move target out of bounds
 (Session info: chrome=102.0.5005.61)
 # ./pages/build_page.rb:17:in `click_warning_icon’
For Selenium v4.2+, I recommend Approach #3.
Refactoring (by Zhimin)
A good habit of good test automation engineers: refactor test steps immediately after test execution is stable: for maintainability and readability.
I invoke “Extract to Page” test refactoring in TestWise.
After the refactoring, the newly-added function is added/created in the BuildPage class, based on Page Object Model in Maintainable Automated Test Design.
class BuildPage < AbstractPage
  def initialize(driver)
    super(driver, "")
    sleep 0.5
  end

  def click_warning_icon
    elem = driver.find_element(:class, "fa-warning")
    driver.action.scroll_by(100, 200).perform
    elem.click
  end
end
The refactored test step:
build_page = BuildPage.new(driver)
build_page.click_warning_icon
It is more readable, but more importantly, it is far easier to maintain.
Further reading:


