
How to run an Effective Suite of Java Selenium Tests - Part 2: Command Line
Running your Selenium JUnit tests via the command line (vanilla & Ant)- the basics

In a previous article, we looked at running some JUnit Selenium WebDriver tests in the IDE.
In this article, we’ll move away from the IDE and look at how to run Selenium tests from the command line.
Why Command Line?
Running tests via the command line is better than from the IDE because execution is more independent. IDEs allow for customisation, for instance, in the run settings you can set additional environment variables, etc. This is convenient, but it can be confusing when you want to run tests on a different machine.
How to Run via the Command Line
There are a few ways to do it, I’ll only go through two methods — directly compiling and running via the command line; and using Apache Ant.
Command Line
To run via the command line, you need to execute two steps:
Compile
To compile the code in Java, use the javac command:
% javac -d target
  -classpath "target:/Users/Shared/java-lib-selenium-webdriver/selenium-java-4.34.0/*"
  Sample.java
This will compile the Java file Sample.java into a folder called target. The classpath flag specifies the classpath, which should be the directory where you saved the Selenium Java testing libraries.
You should see a folder called target with a path target/com/sample/Sample.class that contains the compiled Java file. Now that the Java file is compiled, you can run it!
2. Run
% java
  -classpath 'target:/Users/Shared/java-lib-selenium-webdriver/selenium-java-4.34.0/*'
  com.sample.Sample
It’s quite straightforward, but it’s not easy to remember/have to do the two steps every time. Instead, there are tools to make all this easier!
Ant
I recommend Ant. Apache Ant is a method to create Java scripts, often for building and running tests. Instead of handcrafting the compile and run commands like we did for the script, Ant will simplify that for us.
To install Ant, you can follow the download instructions. On macOS you can also use Homebrew:
brew install antFirst, create an ant file (build.xml). We want to create a build file with two methods of execution — running an individual test and running the entire suite.
Even if you only want to run the entire suite, it’s still a good idea to have an individual test runner. This helps verify if the set up was correct (JAR/classpath check).
There’s other tutorials that go into detail for creating Ant files and what options are available, but I will just share the one I used to run my suite of 20 tests. Importantly, note the compile step (that corresponds to the vanilla version’s javaccommand), and the two execution targets, runTest and runAll.
<?xml version="1.0" encoding="UTF-8"?>

<project name="whenwise-project-junit-selenium" default="default" basedir=".">
    <description>Builds, tests, and runs the project.</description>

    <property name="test.dir" value="test"/>

    <property name="build.dir" value="build"/>
    <property name="classes.dir" value="${build.dir}/classes"/>
    <property name="lib.dir" value="lib"/>
    <property name="result.dir" value="reports"/>
    <property name="result.dir.path" location="${result.dir}"/> <!-- converted to absolute path -->

    <path id="classpath">
        <!--
     Recommend JUnit 4 over 5, just one jar file and easier with Ant
     Note: if you do use JUnit5 and experience test results missing on BuildWise, search 'junit4' the build.rb file, and switch to use junit5
     -->
        <fileset dir="${lib.dir}/junit4" includes="*.jar"/>
        <fileset dir="${lib.dir}/http-client" includes="*.jar"/>
        <fileset dir="${lib.dir}/csv" includes="*.jar"/>
        <fileset dir="${lib.dir}/excel" includes="*.jar"/>
        <fileset dir="${lib.dir}/sql" includes="*.jar"/>
        <fileset dir="${lib.dir}/faker" includes="*.jar"/>

        <fileset dir="${lib.dir}/selenium-dependent" includes="*.jar"/>
        <fileset dir="${lib.dir}/selenium-java-4.34.0" includes="*.jar"/>
        <fileset dir="${lib.dir}/selenium-devtools" includes="*.jar"/>

        <pathelement location="${classes.dir}" />
    </path>

    <target name="clean">
        <delete dir="${build.dir}"/>
        <delete dir="${result.dir}"/>
    </target>

    <target name="compile">
        <mkdir dir="${classes.dir}"/>
        <javac srcdir="${test.dir}" encoding="UTF-8" destdir="${classes.dir}" includeantruntime="false" classpathref="classpath"  debug="true"/>
    </target>

    <target name="main" depends="clean,runAll"/>

    <!-- Run all tests -->
    <target name="runAll" depends="compile">
        <mkdir dir="tmp"/>
        <mkdir dir="${result.dir}"/>

        <junit fork="yes" haltonfailure="no"  failureProperty="test.failure" errorProperty="test.error" >

            <sysproperty key="browser.version" value=""/>

            <formatter type="xml" usefile="true"/>
            <classpath refid="classpath"/>
            <batchtest fork="yes" todir="${result.dir.path}">
                <fileset dir="${test.dir}">
                    <include name="**/*Test.java"/>
                    <exclude name="**/TestHelper.java"/>
                    <exclude name="**/unrefactored/*Test.java"/>
                </fileset>
            </batchtest>

        </junit>

        <echo message="Test results (xml files) shall be in ${result.dir.path} "/>
    </target>


    <!-- Run individual test by supplying full class name with package
   ant runTest -DTestName=tests.LoginTest
 -->
    <target name="runTest"  depends="compile" description="run command-line example">
        <mkdir dir="${result.dir}"/>
        <echo message="Run one single JUnit test, check results: ${result.dir.path}"/>
        <junit failureProperty="test.failure" errorProperty="test.error"  printsummary="yes"  showoutput="true" >
            <classpath refid="classpath"/>
            <test name="${TestName}" haltonfailure="no" todir="${result.dir.path}">
                <formatter type="xml"/>
            </test>
        </junit>

        <copy file="${result.dir.path}/TEST-${TestName}.xml" tofile="/Users/me/.buildwise/agent-test-results/SPEC.result.xml"/>
    </target>

    <target name="verifyNoError" if="test.error">
        <echo message="Opps, Therea are errors (exceptions) occurred!"/>
        <fail message="JUnit tests errors."/>
    </target>

    <target name="verifyNoFailure" if="test.failure">
        <echo message="There are test failures."/>
        <fail message="JUnit tests failed."/>
    </target>

    <!-- execute tests -->
    <target name="go" depends="runAll, verifyNoError, verifyNoFailure"/>

    <!-- all -->
    <target name="default" depends="clean, compile, go"/>

</project>
To execute the entire project, run ant runAll, this will compile and execute all tests. Here is a screenshot of the result below:
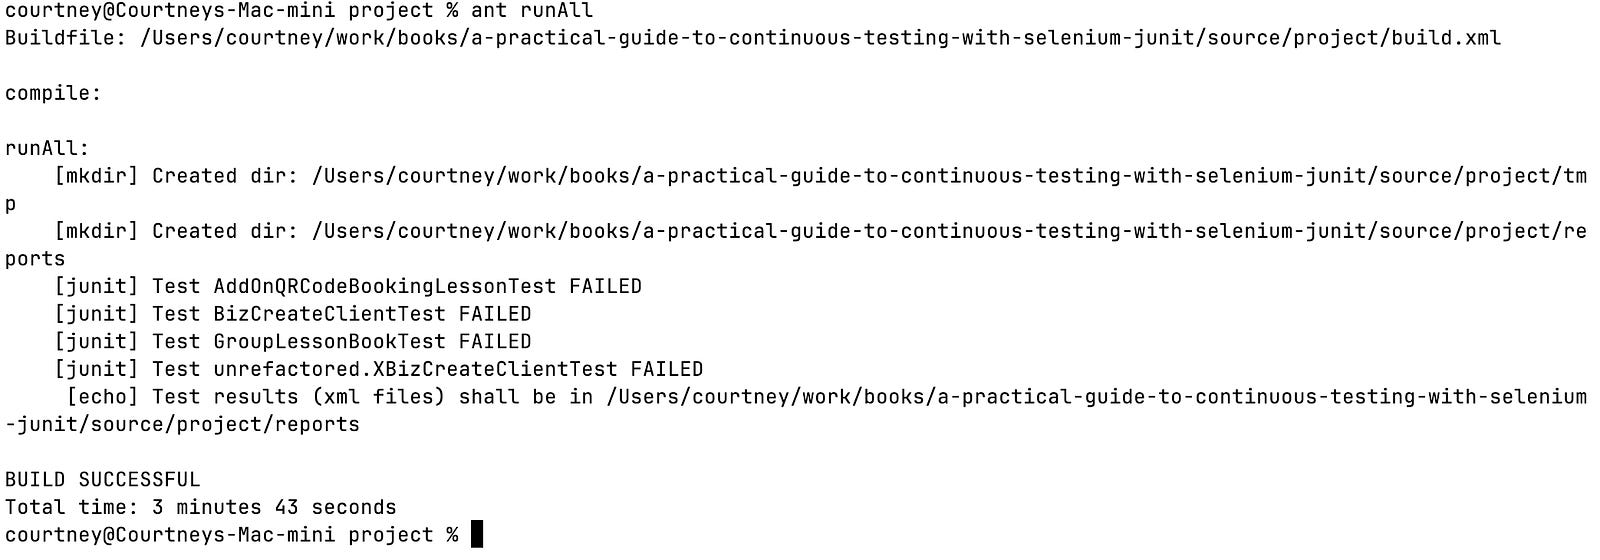
Note: Although 20 tests ran, there is no final JUnit summary (e.g. 20 tests Total, 4 tests failed). There is no standard way to do this single-line summary in JUnit, but you can add the summary for each individual test class (via the build.xml).
Recommended settings for running on the command line.
Improving stack trace error visibility via
build.xml.
Adddebug=trueto thejavaccompile step to get line numbers in the stack trace errors. This will help with debugging test failures.Use Headless mode to run tests (set via ChromeOptions).
This gives you control back when the tests are executing. However, I have some tests that were unreliable with headless mode but worked fine in headed mode. Headless mode is convenient, but be aware of some issues/incompatibility with some tests. Definitely use headed mode for debugging/while creating tests, as it’s much easier.
Using the Command line for running tests
Running tests via the command line is a step forward from the IDE. The command line has allowed us to decouple execution from specific machines (standardised Ant run file), and now has stored history (via JUnit test result files). However, it’s still hard to visualise test execution history or generate reports without the help of other CI/CT tools.
The command-line script has now paved the road for running your tests in a continuous testing server. In the next article, I’ll cover how we could use BuildWise, a CT server, to run Java Selenium WebDriver tests.
Related reading:
My father’s new book: “End-to-end Test Automation Anti-Patterns”
