Set up and Run Selenium C# Tests in Visual Studio Code on macOS
How to use VSCode on macOS to run C# Selenium tests
Readers of my and my father’s blog know that we love to use Ruby to script automated tests. Some might wonder, “Is your view on the best language for test automation changed? Also, C# on macOS?”. This is just a curious exercise for a request. My love for the wonderful Ruby language is the same, probably even more so after this exercise.
Install Visual Studio Code first. The version I used is v1.76 on macOS 12.6.
Table of Contents:
∘ 1. Install .NET SDK (7.0)
∘ 2. Install C# and Nuget package manager extensions into VS Code
∘ 3. Create a MSTest Project Folder
∘ 4. Open the newly created test project folder in VS Code
∘ 5. Add the Selenium WebDriver package to the Test Project
∘ 6. First Selenium C# test
∘ Zhimin’s notes
1. Install .NET SDK (7.0)
Download from https://dotnet.microsoft.com/en-us/download/dotnet/7.0. I chose the “macOS X64”. Run the installer.
Start a new terminal window and enter the command below to verify the installation:
$ dotnet --version
7.0.202
2. Install C# and Nuget package manager extensions into VS Code
Press “Cmd+Shift+X” in VS Code and search for “C#” in the Extension Marketplace.
This is to add support C# in VS Code. Install it.
Repeat the same process for the “NuGet Package Manager”, which helps to add libraries, such as Selenium WebDriver, to test projects.
3. Create a MSTest Project Folder
MSTest framework is a test framework which is included, by default, with Microsoft Visual Studio.
From the terminal, run the command below.
$ dotnet new mstest -o HelloSeleniumTestSample output:
The template "MSTest Test Project" was created successfully.

Processing post-creation actions...
Restoring /Users/courtney/tmp/HelloSeleniumTest/HelloSeleniumTest.csproj:
  Determining projects to restore...
  Restored /Users/courtney/tmp/HelloSeleniumTest/HelloSeleniumTest.csproj (in 1.16 sec).
Restore succeeded.
4. Open the newly created test project folder in VS Code
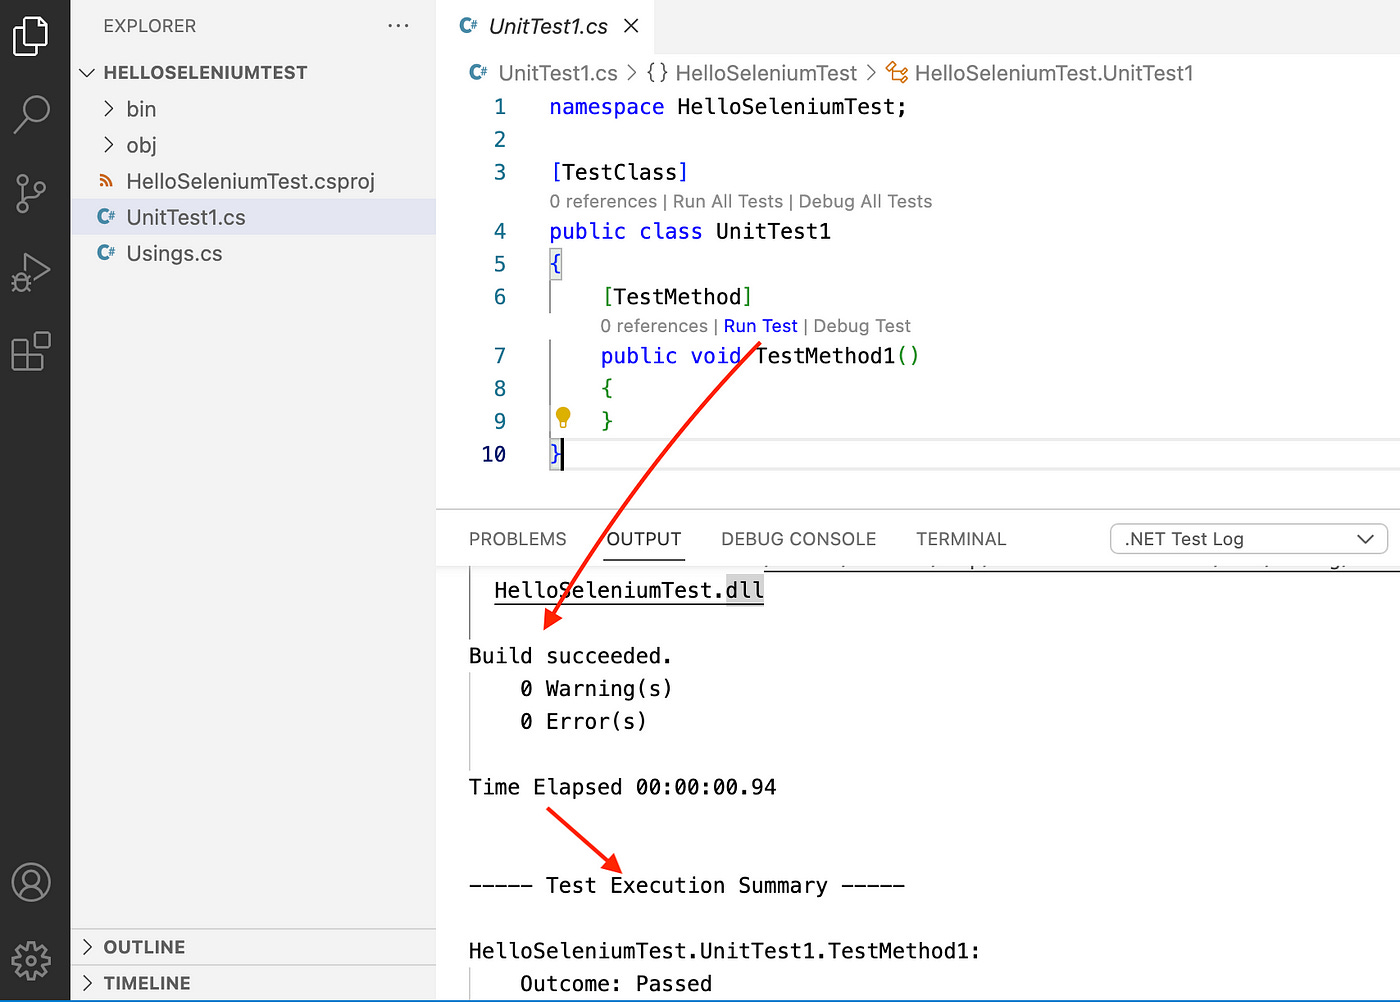
Run the (empty) test case by clicking the ‘Run Text’ link, as indicated below:
There is an extra compilation step for readers who have only used scripting languages, such as Ruby and Python, as C# is a compiled language. As you can see, “HelloSeleniumTest.dll” is the output of compilation (a.k.a build).
Zhimin: while there is a very short delay for the compilmation step, about 1 second for this tiny project, it does not feel right. Scripts has meaning of “ready to go”. To me, it breaks rythem. Check out my article, Automated Test Scripts Shall be in the Syntax of a Scripting Language, Naturally!
Some might argue that, with IDE caching, the compilmation can be quick. Yes, that’s true most of times, but why bother? I can achieve the same (and better) outcome using Ruby language. In End-to-End test execution, compiled languages have little advantages on speed. Check out my article, Performance Comparison: Selenium Ruby, Python, and JavaScript (Node.js).
This empty test case is meaningless, but seeing it passed means your MS test setup (with SDK) is correct.
5. Add the Selenium WebDriver package to the Test Project
We want to run a Selenium C# test that drives a chrome browser (on macOS). There are three prerequisites:
Chrome browser
ChromeDriver for the matching browser version is in the PATH
Selenium WebDriver library is installed and configured in the test project.
The first two are generic and needed for any WebDriver’s powered automation. (Check out my other article, Resolve ChromeDriver Issues in Web Test Automation, if you run into issues, which is highly unlikely)
The latter one we can achieve with NuGet package manager.
Keep reading with a 7-day free trial
Subscribe to The Agile Way to keep reading this post and get 7 days of free access to the full post archives.


