Set up, Develop Automated UI tests and Run them in a CT server on your First day at work
Step by step guide to set up developing Selenium WebDriver tests and run all tests in a Continuous Testing Server, quickly!
A repost of my past article on Medium (2022)
If you start a new job in automated testing, you probably want to show your team an example of running a real automated test as quick as possible. I mean, in a matter of hours.
Table of Contents:
· All-in-one Functional Testing Tool: TestWise
  ∘ Verify Chrome Browser and Browser Driver
  ∘ Run first Selenium test
  ∘ First test project
· Run tests from the command line
  ∘ Installation
  ∘ Run RSpec Tests from the Command Line
· A Note on Text Editors
  ∘ Visual Studio Code (VS Code)
· Use TestWise Standard Edition
  ∘ Installation
  ∘ Verify Installation
· TestWise Features
  ∘ Simple and Easy
  ∘ Code Library & Snippets
  ∘ Keep the browser open on executing a single test case
  ∘ Running selected test steps against the current browser.
· Develop and run Selenium/Appium tests in other languages
  ∘ Mocha (Node.js)
  ∘ Note one Mocha (Node.js)
  ∘ PyTest (Python)
  ∘ Note on PyTest
  ∘ Cucumber
  ∘ Note on Cucumber
  ∘ TestWise can run all these frameworks in one test project.
  ∘ Recommendation
· Run all tests in a Continuous Testing Server
  ∘ What is unique about CT servers?
· Installing BuildWise Server
  ∘ BuildWise — How does it work?
  ∘ Setup a Sample Project in BuildWise
All-in-one Functional Testing Tool: TestWise
TestWise is a functional testing IDE that supports free, open-source test automation frameworks such as Selenium WebDriver, the most popular one that conforms to the W3C WebDriver standard. TestWise is the only software you will need to create and run tests for now.
Download the Ruby Edition of TestWise if you are on Windows. macOS and Linux users should install Ruby first, then TestWise Standard Edition (I will cover the use of Standard Edition later).
TestWise Ruby Edition =
TestWise Standard Edition + Ruby + Testing Libraries + ChromeDriver
Launch TestWise. You will see the following popup window for 10 seconds. Click the “Continue” button. You may use TestWise in this free (and full-featured) mode forever, after 15 test executions, simplely restart TestWise, which takes only a few seconds.
Verify Chrome Browser and Browser Driver
From Selenium WebDriver 4.11, the browser driver is auto-managed, you can skip this section. See this document. For example, the chromedriver is saved under /Users/ME/.cache/selenium/chromedriver/mac-x64/117.0.5938.149 on my MacBook.
Next, we want to verify the ChromeDriver on your machine. Without it, you cannot drive the browser (for web testing).
TestWise Ruby Edition includes a version of ChromeDriver, in C:\agileway\TestWise7\interpreters\ruby\bin . Make sure it matches the version of your Chrome.
To check your browser’s version you can go
Help > About Google Chrome
If the versions are not matching, download the correct version of ChromeDriver, and save it into C:\agileway\TestWise7\interpreters\ruby\bin.
Run first Selenium test
TestWise has a sample project that we can use to run our first test.
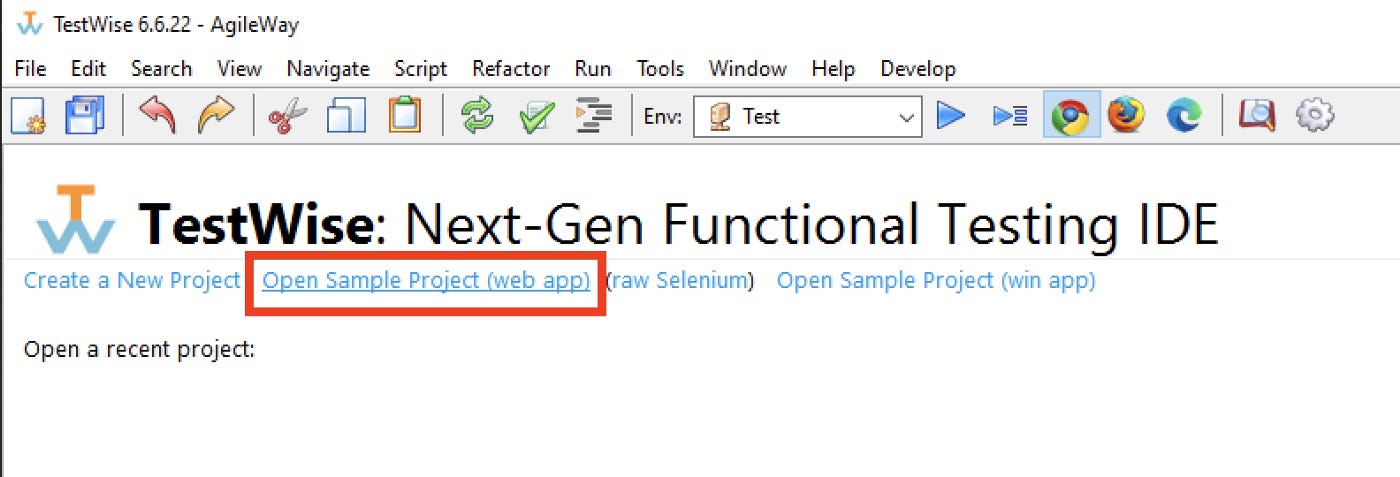
On the start screen, select Open Sample Project (web app).
You will see some folders (on the left), which contain the same set of tests for different languages. Ignore that for now.
Expand the spec folder, click the test script file 01_login_spec.rb . The test script content will be opened.
Right-click a line under the test case name (it “…” ) and select “Run …” to run the test case, or use the blue triangle button on the toolbar. (open this animated GIF to see it in action).
Here we can see that it successfully opens Chrome and drives the browser. Great! This means we can begin writing our own tests.
First test project
Close the sample project (File > Close Project) and create a new one (File > New Project).
Fill in the pop-up with appropriate details for your project. I will do an example on courtneyzhan.com.
When you create a new project, a project skeleton will be created. Write your first test in new_spec.rb (feel free to rename this file later). And you can start writing your tests here!
Here is one simple test to verify that the navigation scroller scrolls correctly to the Contact section.
  it "Scroll to Contacts" do
    elem = driver.find_element(:xpath, "//ul[@id='js-scroll-nav']//li//a[text()='Contact']")
    elem.click    expect(page_text).to include("CONTACT ME")
    sleep 0.5 # wait for JS scroll

    contact_elems = driver.find_elements(:xpath, "//address/div")
    expect(contact_elems[3].text).to include("MEDIUM")

    driver.find_element(:partial_link_text, "MEDIUM").click
    current_url = driver.current_url
    expect(current_url).to eq("https://courtneyzhan.com")
  end
Run your test. You shall see test execution in a new Chrome browser, like the animated gif above. Congrats! You’ve written a test on your first day already!
Of course, it doesn’t stop here. Edit it, refactor (learn later) it and write some more.
Run tests from the command line
The above test scripts are in raw Selenium WebDriver (with Ruby binding); this means we can use any text editors (such as Notepad or Visual Studio Code) and run tests from the command line.
Ideally, we don’t want to couple our work too tightly to a specific tool. Executing tests from the command line can help remove that dependency. This is also necessary for Continuous Testing setup further down the track.
Now we have installed TestWise Ruby Edition, which does most of the heavy lifting for us. This is equivalent to installing:
TestWise Standard Edition + Ruby + Testing Libraries + ChromeDriver
Now I will show how to write and run tests without TestWise (I highly recommend TestWise, which I use every working day). This article aims to show total freedom with the test scripts, 100% raw Selenium WebDriver, created by TestWise.). Instead, we’ll manually install Ruby, ChromeDriver & Testing Libraries independently.
Installation
We will need to install Ruby, ChromeDriver & Testing Libraries to get started.
Ruby
RubyInstaller for Windows with Devkit, such as ‘Ruby+Devkit 3.2.6–1 (x64)’, and run the installer. For macOS or Linux, use the usual package installer.Testing Libraries (called gems in Ruby)
Installselenium-webdriver,rspec, …, etc with the command like below:gem install selenium-webdriver
See this article below for detailed instructions on how to do this and execute RSpec tests on the command line.
10-Minute Guide to Set up Test Automation using Selenium WebDriver with Ruby
Run RSpec Tests from the Command Line
Now run a sample RSpec test (tests can be cloned here).
> cd C:\demo\agiletravel-ui-tests\selenium-webdriver-rspec
> rspec spec\login_spec.rb
You will see the test execution in a Chrome browser. The output in the command window will look similar to the following:
A Note on Text Editors
Selenium WebDriver test scripts are in plan-text. You may write your tests in a programming editor of your choice before running them. Some programming editors can provide extra functions that can make your life easier. A popular choice is Visual Studio Code (download link).
Visual Studio Code (VS Code)
VS Code does have extensions that can do one-click execution for RSpec tests in the editor. This is convenient.
My favourite extension for RSpec tests is Ruby Test Runner by Mateusz Drewniak (Marketplace link here).
In VS Code, you can open the Marketplace with Ctrl + Shift + X on Windows, or Cmd + Shift + X on Mac. There, you can search for Ruby Test Runner and install it.
Once installed, you will notice that there is now a “▹Run Test” option before every test suite and test case. Below I have highlighted the new option.
After installing the VS Code “Ruby Test Runner” extension, there is a “Run test” button.
Click the “Run test” button (or use the key-binding Ctrl + Shift + T) and you will see the VS Code Terminal open and execute the RSpec test.
Screenshot of the terminal after the test is triggered through Ruby Test Runner.
This is equivalent to manually entering rspec <name of test file> in a terminal.
Overall, independently installing the necessary programs and executing tests on the command line is an essential part of setting up an automated test execution environment.
VS Code’s extensions make it better than some other plain text editors for writing and executing RSpec tests. However, I still prefer using TestWise, a dedicated Functional testing IDE. TestWise has some features like execution hooks that are very useful when running and debugging tests. But, if you cannot use TestWise, then VS Code is a good alternative.
Use TestWise Standard Edition
TestWise Ruby Edition works, but it is only available for Windows. To use TestWise on macOS or Linux, you must use the TestWise standard edition. While the TestWise Ruby Edition nicely includes all the necessary packages but does not give you control over versions, it might not be transparent when upgrading (ChromeDriver, testing libraries or language runtimes such as Ruby and Python).
Installation
We will need to install TestWise Standard Edition, Ruby & Testing Libraries.
TestWise Standard Edition
To install the Standard Edition, click the red ‘Download Now’ button for your OS (link).
Run the executable (.exe for Windows, .dmg for macOS), and TestWise will be installed in a matter of minutes.Ruby and Test Libraries
(See above)
Verify Installation
Now that we’ve installed all the components make sure they are in the right place so that tests can be executed. Luckily, TestWise can verify this for us.
Launch TestWise, which only takes a few seconds. Go to Settings, then the Frameworks tab and click Detect. This will check your versions of test frameworks and verify they can be found on your device.
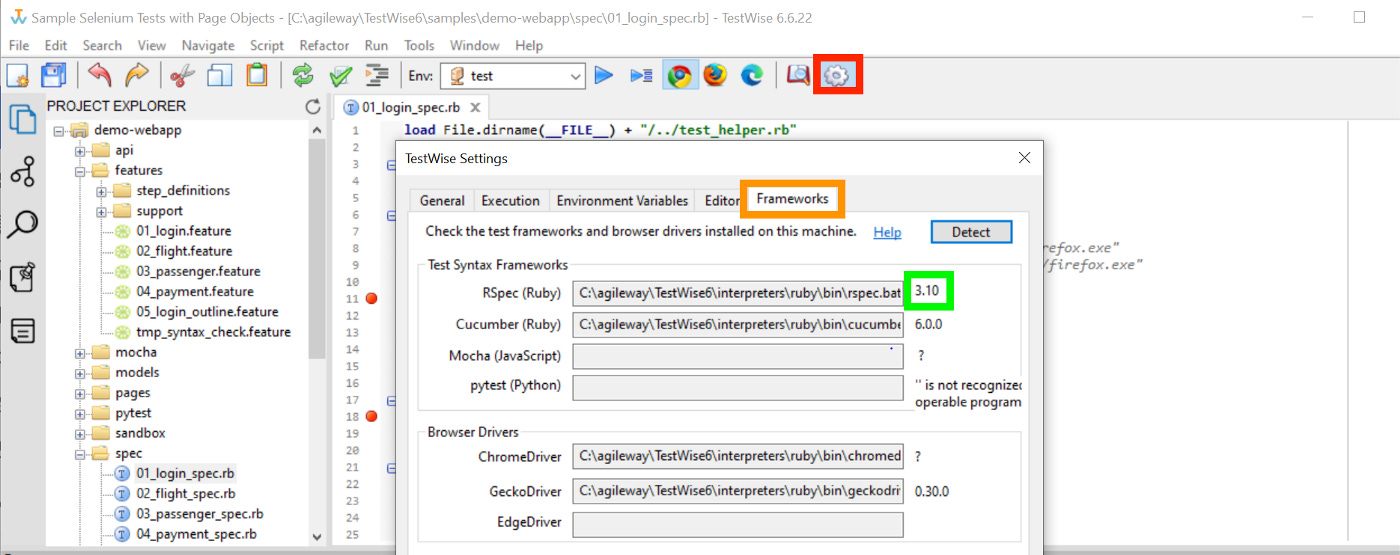
If a Ruby version can successfully be detected (i.e. there is a number and not a ‘?’), then success! If not, check and edit the ‘Execution Path’ under the “Execution” tab and relaunch TestWise if necessary.
TestWise Features
We covered how programming editors can be used for writing (and running) automated tests. So why would we need a specialised IDE like TestWise?
Simple and easy to use
Code library & snippets
Keeping a browser open
Running selected test steps against the current browser
Simple and Easy
Different from programming editors, such as Visual Studio Code, TestWise was created from the ground up exclusively for developing/debugging automated functional tests. This makes it easy for less-technical team members such as manual testers and business analysts to get involved with automated testing, which many software projects thought was impossible.
Can you imagine a business analyst or customer to run test automated tests in Eclipse or Visual Studio? Think about it, it does not that be that complex. Autotmated testing is just another way ‘using’ the app. With TestWise, the learning curlve is reduced to a matter of seconds.
For example, running a test case is as easy as: open and run.
Code Library & Snippets
TestWise features a script library with common and useful commands. See the below screenshot for a selection of scripts.
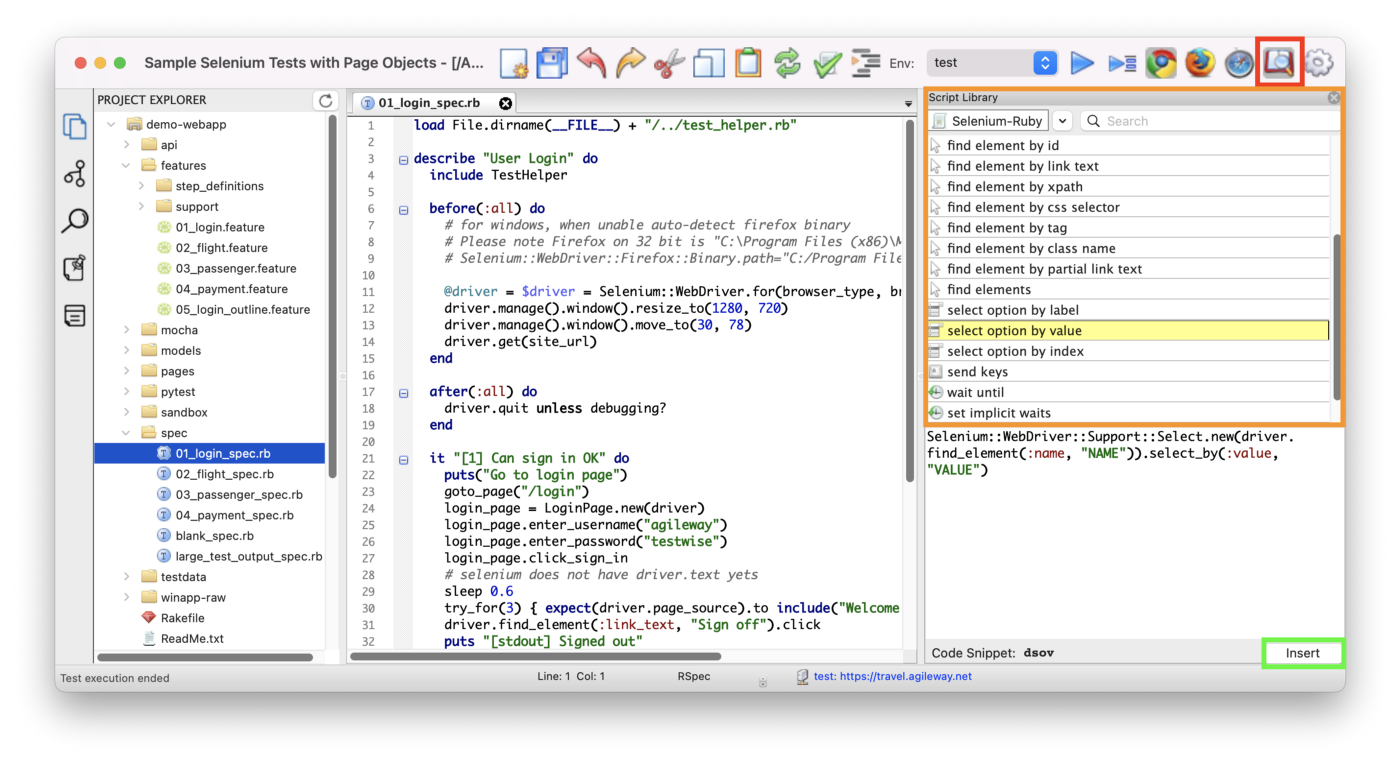
This is a beneficial feature for beginners to automated testing. It is quick to look up what you are trying to achieve (e.g. selecting from a dropdown/combo box by label) and insert it. The script library also includes more advanced and uncommon scripts like “wait until” and accepting JavaScript dialogue boxes.
You may have noticed that there are also ‘Code Snippets’ at the bottom of the Script Library panel. These are shortcuts you can use the ‘Tab’ key to expand to complete commands.
These snippets can increase your efficiency (dfei is much easier to type than the full driver.find_element(:id, "")). Code snippets can be found via the code library.
Keep the browser open on executing a single test case
One other feature is that the browser can stay open after executing a single test case. This is extremely helpful.
As in the previous GIF (pasted below for convenience), we only ran one test. And we can see that once the test completes, the browser window remains open.
This feature is helpful when writing the tests. It means you can continue and do manual work without needing to open a browser and manually repeat the steps yourself.
This is especially helpful for debugging. For instance, if a button you are trying to click fails; you can verify the xpath by inspecting the open browser. I have personally found this to be very useful when debugging tests and is essential to TestWise’s most important feature — running selected test steps against the current browser.
Running selected test steps against the current browser.
I will detail this feature in a different article (it’s that good). But the crux of this feature is that it enables you to run any test steps on a currently open browser. This means you won’t have to restart the test from the beginning and focus on particular test steps to ensure they are working as intended. It can easily save a few hours every day for test automation engineers.
Attach Selenium Python test steps against an existing browser
Develop and run Selenium/Appium tests in other languages
I recommend that you follow the above steps to install TestWise Standard Edition, with executable environments set up for your test scripts, such as Python for Pytest, Ruby for Cucumber, Node.js for Mocha.
You can verify the setup (being able to run tests from the command line) in TestWise.
Mocha (Node.js)
Mocha is one of the most popular JavaScript test frameworks. Here, I will focus on Selenium WebDriver’s JavaScript binding of Mocha. Below is a sample Mocha test.
describe('User Authentication', function() {    before(async function() {
    this.timeout(timeOut);
    driver = new webdriver.Builder().forBrowser('chrome').setChromeOptions(helper.chromeOptions()).build();
    driver.manage().window().setRect({width: 1027, height: 700, x: 30, y: 78})
  });    beforeEach(async function() {
    this.timeout(timeOut);
    await driver.get(helper.site_url());
  });    after(function() {
    if (!helper.is_debugging()) {
      driver.quit();
    }
  });    it ('[1,2] Invalid user', async function() {
    this.timeout(timeOut);
    await driver.findElement(webdriver.By.name('username')).sendKeys('agileway');
    await driver.findElement(webdriver.By.name('password')).sendKeys('whenwise');
    await driver.findElement(webdriver.By.name('commit')).click();
    await driver.getPageSource().then(function(page_source) {
      assert(page_source.contains("Invalid email or password"))
    });
  });    it('User can login successfully',  async function() {
    this.timeout(timeOut);
    await driver.findElement(webdriver.By.name('username')).sendKeys('agileway');
    await driver.findElement(webdriver.By.name('password')).sendKeys('testwise');
    await driver.findElement(webdriver.By.name('commit')).click();
    await driver.getPageSource().then(function(page_source) {
      assert(page_source.contains("Welcome"))
    });
    await driver.findElement(By.linkText("Sign off")).click();
  });});
To create a new Mocha project in TestWise, select ‘Mocha’ for the Test Script Syntax.
TestWise will help you set up a project skeleton with a helper method. From here, you can begin writing your tests and running them!
Note one Mocha (Node.js)
As one of the long-standing and most popular JavaScript test syntax frameworks, I recommend Mocha over other JavaScript alternatives.
Generally, I don’t find JavaScript tests as readable as RSpec tests. There are many asyncand await calls, plus an abundance of semicolons. To readers with a non-JavaScript background, it can be not very clear. Tests should be readable and usable for everyone in a team (including non-technical members like Business Analysts), and JavaScript can be a blocker.
An important note is that in RSpec, all the page object models in the/pages folder will be imported. In JavaScript, you will need to import each page manually (please let me know if you know a better and simpler way). For example:
var FlightPage = require('../pages/flight_page.js');Reimporting pages at the top of every spec can easily slip your mind, so it is something to remember.
PyTest (Python)
PyTest is a test syntax framework in Python. PyTest is compatible with the standard unittest (for unit testing), it can be used for functional test scripts as well.
To ensure you installed PyTest correctly, use TestWise’s sample project, open the pytest folder and run a file.
Here is the first test in the sample file 1_login_test.py:
import unittest
import xmlrunner
import time
import datetime
import sys
import os
from selenium import webdriver
from selenium.webdriver.support.ui import Select
from selenium.webdriver.common.by import By
from selenium.webdriver.support.ui import WebDriverWait
from selenium.webdriver.support import expected_conditions as ECsys.path.insert(0, os.path.dirname(os.path.realpath(__file__)) + "/../")
from test_helper import TestHelper
from pages.login_page import LoginPageclass LoginTestCase(unittest.TestCase, TestHelper):  @classmethod
  def setUpClass(cls):
    if os.environ.get('BROWSER') == "firefox":
      cls.driver = webdriver.Firefox()
    else:
      cls.driver = webdriver.Chrome()
    cls.save_driver_session()
    cls.driver.set_window_size(1280, 720)
    cls.driver.set_window_position(30, 78)  @classmethod
  def tearDownClass(cls):
    if not cls.is_debugging():
      cls.driver.quit()    def setUp(self):
    self.driver.get(self.site_url())    def test_sign_in_failed(self):
    self.driver.find_element(By.ID, "username").send_keys("agileway")
    self.driver.find_element(By.ID, "password").send_keys("badpass")
    self.driver.find_element(By.XPATH, "//input[@value='Sign in']").click()
    self.assertIn("Demo Fail this test case",
      self.driver.find_element(By.TAG_NAME, "body").text)
To create a new PyTest project in TestWise, select ‘Pytest’ for the Test Script Syntax.
Again, TestWise will helpfully create the project structure and helper files.
Note on PyTest
PyTest is a robust Python test framework that extends beyond automated functional UI testing. As such, some Python programmers may already have experience in PyTest.
I have found that the self can be frustrating to remember. This is because, without it, it is incredibly similar to RSpec. It looks better when page object models are used and self won’t be used much within a test method.
Something to note for Python tests is to look out for indenting, especially for non-python programmers. Sometimes TestWise’s autoformatter (or human error) can affect the indenting, so be careful when refactoring.
Cucumber
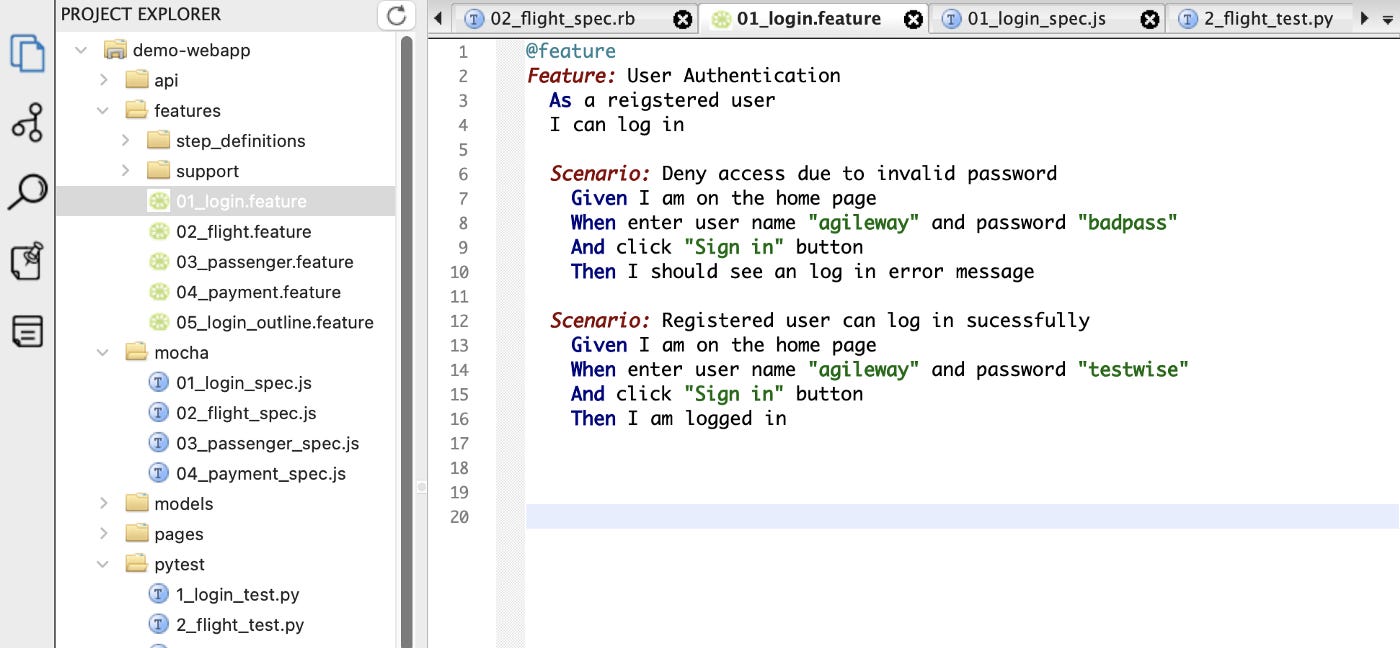
Cucumber is a specialised Behaviour-Driven Development (BDD)-based testing framework written in Ruby. Here is a sample Cucumber test.
@feature
Feature: User Authentication
  As a reigstered user
  I can log in  Scenario: Deny access due to invalid password
    Given I am on the home page
    When enter user "agileway" and password "badpass"
    And click "Sign in" button
    Then I should see an log in error message
Warning: this syntax (Gherkin) looks readable, however, it comes with a huge maintenance cost, the cost that has failed many test automation attempts. For more, please read this article: Why Gherkin (Cucumber, SpecFlow,…) Always Failed with UI Test Automation?
To create a new Cucumber project in TestWise, select ‘Cucumber’ for the Test Script Syntax.
Again, TestWise will helpfully create the project structure and helper files.
Note on Cucumber
As Cucumber is Ruby-based, I recommend writing the test cases in RSpec first before converting them to Cucumber. For instance, in the above Cucumber test excerpt, the line “When enter user X and password Y” is defined as:
When('enter user {string} and password {string}') do |user, pass|
  driver.find_element(:id, "username").send_keys(user)
  driver.find_element(:id, "password").send_keys(pass)
end
You may notice that the content of the method is the same as in RSpec. Hence, if you must use Cucumber, I recommend writing tests in RSpec first, then refactor it out to a Cucumber script.
TestWise can run all these frameworks in one test project.
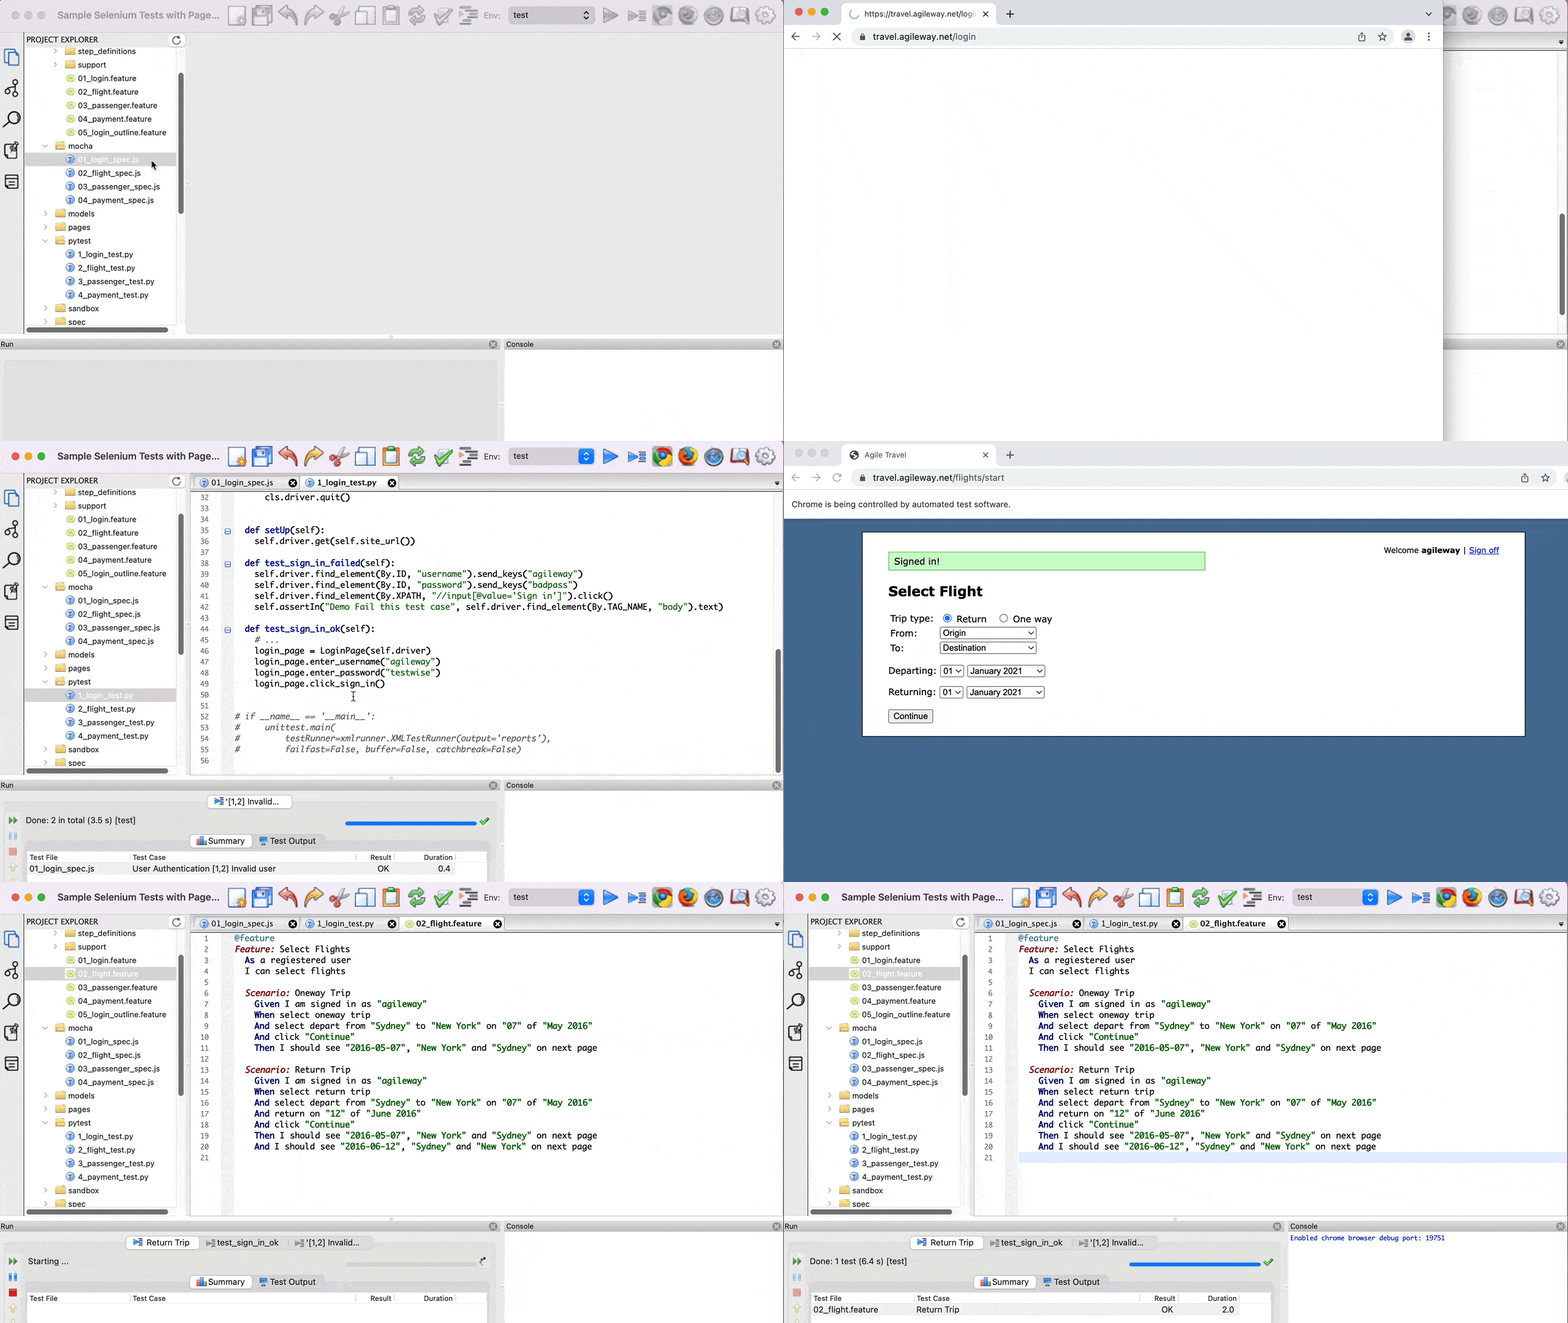
TestWise is mostly a generic functional testing IDE, which means it can support multiple test syntax frameworks in various scripting languages. You can even include different test scripts within one test project, such as RSpec, Cucumber, PyTest and Mocha.
Below is a video (animated GIF) of TestWise executing MochaJS, PyTest and Cucumber tests, all in the same project.
Recommendation
I use TestWise for developing/debugging automated tests for API, Web apps and Desktop apps.
API: raw Ruby with RSpec
Web app: raw Selenium WebDriver with RSpec
Desktop app: raw Appium with RSpec
After reaching a dozen tests, I don’t run the whole suite in TestWise or any other testing tools. Instead, you should (actually must) run all tests in a Continuous Testing server such as BuildWise.
Run all tests in a Continuous Testing Server
Once you have written quite a few functional automated End-to-End UI tests, it is not practical to run all tests on your local machine frequently. Instead, you should run them on a Continuous Testing (CT) server.
You may have heard of Continuous Integration (CI) servers. However, CT servers are different from CI servers. CI servers are more appropriate for executing unit tests, and CT servers are more suitable for executing brittle and longer running functional tests.
What is unique about CT servers?
CT servers provide features that are essential for managing executions of functional tests. CI servers (or no servers at all) lack these features and can lead to frustration down the road when your test suite grows in size. Therefore, I highly recommend using a CT server and setting it up early in your project.
Some of these features are:
Auto retry failed test execution (once)
Due to many variables (e.g. network, loading time), functional UI tests are flakey by nature. As a result, we do not want to restart the execution if a test fails when it shouldn’t. Instead, we want to rerun that specific test! This feature is a huge time saver.Manual retry
Sometimes, auto-retry may not be enough. For example, an external service is down. In such cases, manual retry helps to reduce false alarms.Intelligent ordering
This feature changes the run order based on a variety of factors. This can ensure quick feedback as new tests, recently failed, and commonly failed tests are run first. Some CT servers even allow you to edit the priority of tests manually so you can push a particular test to run earlier.
Installing BuildWise Server
BuildWise is a free and open-source CT server. It is quite easy to install, around 10 minutes. For instructions to install BuildWise, please follow the guide in the link below up to the Create a Build Projectsection.
Set Up a Continuous Testing server to Run Selenium Tests in Minutes
You should now have BuildWise running on your http://localhost:3618
Then log in (default username admin and password buildwise).
BuildWise — How does it work?
All CI/CT servers (including BuildWise) at a high level perform the following core tasks:
Pull the latest commit from the source
Execute your tests
Show test results and execution history
Reporting
Setup a Sample Project in BuildWise
First, let’s clone a sample project. Make sure you have Git installed.
On your command line, navigate to a working folder of your choice and clone the BuildWise provided sample project.
git clone https://github.com/testwisely/buildwise-samples.gitOnce complete, you should see this output on the command line:
C:\Users\CIO\Documents\Courtney>git clone https://github.com/testwisely/buildwise-samples.git
Cloning into 'buildwise-samples'...
remote: Enumerating objects: 223, done.
remote: Counting objects: 100% (223/223), done.
remote: Compressing objects: 100% (153/153), done.
remote: Total 223 (delta 75), reused 201 (delta 56), pack-reused 0R
/s
Receiving objects: 100% (223/223), 3.66 MiB | 5.75 MiB/s, done.
Resolving deltas: 100% (75/75), done.
Open http://localhost:3618/
in your browser and click the ‘Create a New project’ button.
Use the ‘Fill demo project’ drop down to prefill some fields for you on this screen.
In this guide, I am selecting the RSpec demo, but the sample Git repository supports all listed options.
In the ‘Working folder’ field, make sure to change this to the actual location of your cloned repository. Mine was in C:\Users\CIO\Documents\Courtney\buildwise-samples.
To create your project, click ‘Create’.
Back at the home screen, there should be a new project.
Trigger a build (execute all the tests) by clicking ‘Build Now’.
You should see windows open and the tests start to run on a demo site. You will also see the test results appearing on BuildWise (browser).
Once the build completes, you will see a summary test report.
At the top (highlighted in orange), you can see the number of failures overall. It is colour coded (green if all passed or red if there are any failures).
The green box shows the details of each test file and case within the files. In this case, the passenger_spec.rb failed. You can view the detailed error by clicking the camera button next to a failed test (highlighted in red),
This error view contains a screenshot of the web app when the test failed and the error message. It also allows you to copy the ‘error line’ to navigate to it quickly in TestWise.
Hopefully, you can see that it is pretty easy to set up your project in BuildWise. One-click execution and detailed error messages have helped me run and detect errors.
You can click one button to run all your tests from now on. You are free to do other tasks while the tests are being executed and check the results later. If you prefer monitoring test execution, the result of one test execution shows up on BuildWise immediately after it completes.
For more on CT, check out this book, Practical Continuous Testing.


