Why Raw Selenium Syntax is better than Cypress and Playwright? Part 3: Accurate, Intuitive, Consistent, and Geniously Designed
Head-on Comparison of the Factors that matters
After Part 1 and Part 2, some desperate JS testers might have been waiting for this article to see what I have to say about a direct comparison of Selenium vs (Cypress or Playwright) for the technical engineers level. Even after acknowledging the facts in Parts 1 and 2, some might think Cypress/Playwright wins Selenium in the aspect of technical engineers. Wrong! Raw WebDriver syntax is heaps better than Cypress/Playwright in this tier too.
Initially, I was only planning to write this single article on WebDriver syntax advantage over Cypress/Playwright. During writing, due to many lies spread by fake automated testers and vendors, I thought it better to clear those first. So, there were Part 1 and Part 2.
Now, let’s get to the business. Reminder, we are talking about the technical aspects of automation scripts, excluding the views of non-tech team members. Below are the factors I will be using to compare,
Easy to learn (to train new testers)
How easy to remember core test syntax
Consistency
Accuracy
Specific
(good automation means specific commands)Efficiency, with tool consideration
Do you agree? Let’s go.
Table of Contents
· WebDriver: One Intuitive and Consistent Syntax
∘ Step 1. Locate the control
∘ Step 2: Act on it.
· Cypress and Playwright Syntax: Bad
· Selenium’s “Find Element then Act” follows Test Automation Rythem
· Accuracy: WebDriver is clearly the winner
· WebDriver: The “find element …” syntax is a genius design
· Specific & Consistency
· Efficiency
WebDriver: One Intuitive and Consistent Syntax
Below is a slide taken from my Selenium WebDriver Training Workshop series, which is designed for ages 10+.
Let’s examine the individual test step level (for the web), typing an email in a text box, for example. Yes, a preschooler can do that, just move the mouse on it, click, and then type some text.
But we are automated testers, we need to provide specific instructions. The natural thoughts will be
Locate (or Find, the terminology does not matter here) the target text box
don’t care how yet.Type some text in it
Step 1. Locate the control
I will just focus on the first operation, ‘Find the Control”. The controls on a web page are known as “elements”. Here it is, “Find the Element”, that’s how a typical Selenium WebDriver test statement starts.
driver.find_element(id: "username")
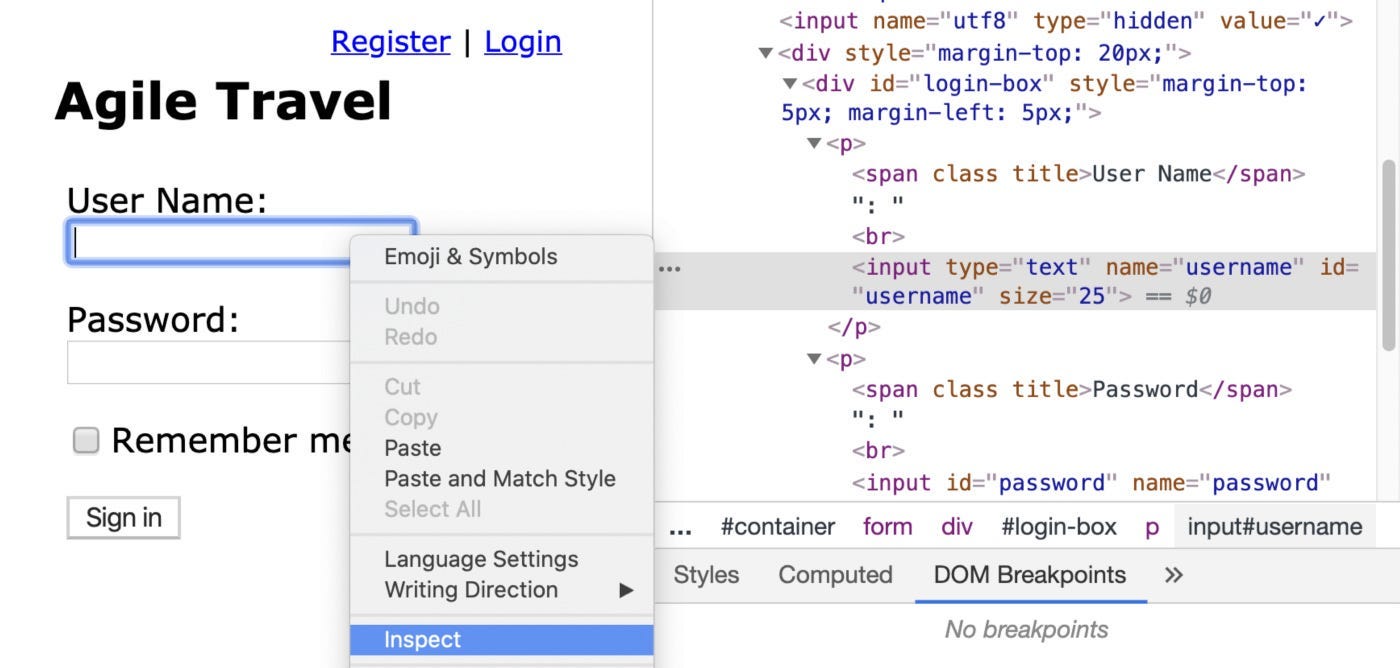
How does a test engineer know using “ID: username” in this case? They find the element (using the mouse, manually), right-click and select ‘Inspect’, to view its HTML fragment.
From the HTML for the selected element, the test engineer choose to use id: 'username' . Logical and simple, for the locating part (step 1), right?
Step 2: Act on it.
For our entering-text operation, after finding the control,
driver.find_element(id: "username")
our next operation is to perform an action on it. This is a text box, the syntax for ‘typing text’ (more than that, I will explain more shortly) is send_keys . So the action is:
send_keys("wise@tester.com")
To put it together,
driver.find_element(id: "username").send_keys("wise@tester.com")
A standard selenium test statement.
Because core WebDriver syntax follows this simple and intuitive pattern, it is so easy to learn.
# Selenium Examlples:
driver.find_element(...).send_keys(...) # enter text in a text field
driver.find_element(...).click          # clicking a button
driver.find_element(...).text           # return the text view of an element
Soon, beginners can get used to and remember find_element(...) , then suddenly, the whole script is much easier to understand. Now, if you are totally new to WebDriver, with the above simple introduction, Can you understand the below, a complete user login test?
it "user login" do
  driver.find_element(:link_text, "SIGN IN").click
  driver.find_element(id: "username").clear
  driver.find_element(id: "username").send_keys("wiser@selenium.com")
  driver.find_element(:name, "password").send_keys("sogreat")
  driver.find_element(:xpath, "//input[@value='Sign in']").click
  expect(driver.find_element(:tag, "body").text).to include("Signed in")
end
Cypress and Playwright Syntax: Bad
In this article, I will focus on Playwright, which is better than Cypress and many JS testers think so too. As you might have noticed, more and more JS testers dumping Cypress for Playwright.
Anyway, I quickly show a Cypress example.
 cy.visit('/login')
 cy.get('input[name=username]').type(username)
 // {enter} causes the form to submit
 cy.get('input[name=password]').type(`${password}{enter}`)
 // we should be redirected to /dashboard
 cy.url().should('include', '/dashboard')
Basically, for just a few statements.
driver=>cy
lose the meaning of “Drive” the browser, not good. Replaced with proprietary ‘cy’, eh ...find_element=>get
lose the meaning of “Find Element” (see the above section), bad. Not long ago, in the hugely popular and failed ProtractorJS (very likely JS testers have used it before),getmeant navigating to a URL.assertion adds custom comparators (as string),
"include"
this is bad, as testers need to remember the comparators, as a string. Theinclude(..)in our previous ruby example is the language keyword (highlighted differently in testing IDE/coding editors).
Check out my other article, “Software Complexity Assessment”.
Here is a simple Playwright example.
await driver.fill("#username", "agileway")
await driver.fill("#password", "testwise")
await driver.click("input:has-text('Sign in')")
await driver.textContent("body").then(function(body_text) {
   assert(body_text.contains("Signed in"))
})
Different from Selenium’s “Find the element, then Act” order, Playwright syntax is “Act on a specified element”. As we discussed before, that is not as intuitive. Some might think “Zhimin, you are too picky. It is a matter of personal preference. I find Playwright's order good”. Read on.
Selenium’s “Find Element then Act” follows Test Automation Rythem
A highly-skilled craftsman works on a rhythm. I really like the working rhythm with the Selenium syntax.


